Monthly Archives: December 2023
Integrate Your Inspections with Google Calendar
Posted on December 13, 2023
Thanks to Jason for suggesting a way to streamline inspection management. His request was to sync inspections with Google Calendar to make scheduling more efficient and prevent any double bookings. With inspections often planned weeks in advance, this integration allows users to easily see their availability for additional meetings (or maybe golf?).
Now, RentHQ users can link their accounts to Google Calendar on an individual basis, ensuring that only their designated inspections populate their calendar.
Here's how to set it up:
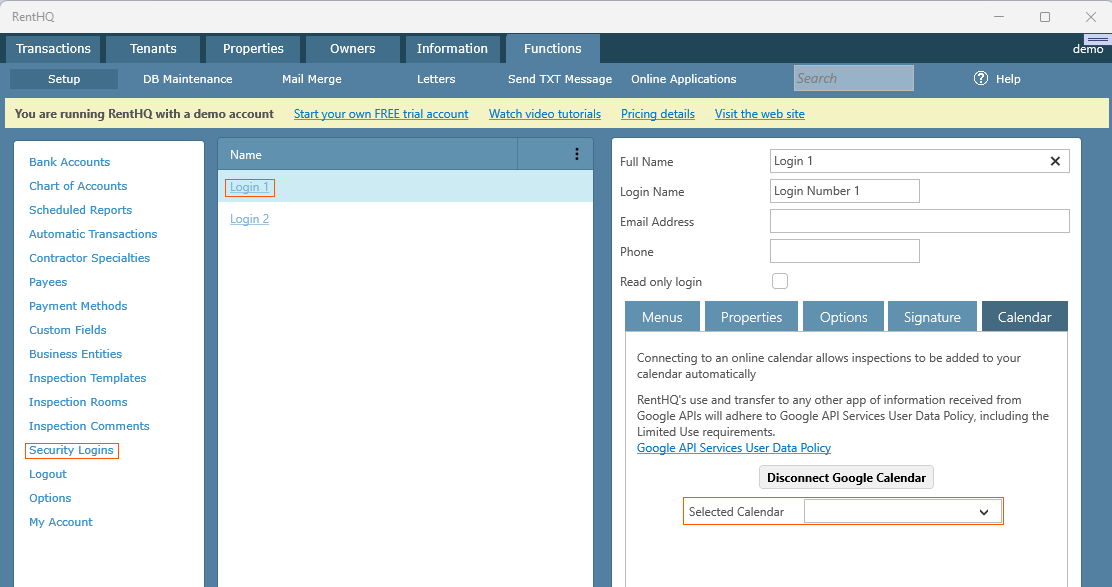
1. Navigate to Functions/Setup/Security Logins.
2. Select the user's login and access the Calendar tab.
3. Click on 'Sign in with Google' to connect your RentHQ user account to your Google Calendar.

Once linked, if you have multiple calendars, return to the login screen to designate the specific calendar for your inspections.
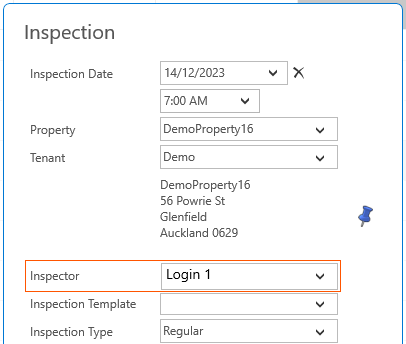
When creating inspections, it's important to select the appropriate 'inspector' to link the inspection correctly. For instance, in the images shown above with two logins, the Google calendar is linked to 'Login 1.' Therefore, ensure that the designated inspector is selected during inspection creation. Inspections without an assigned inspector won't be linked to any Google calendars.
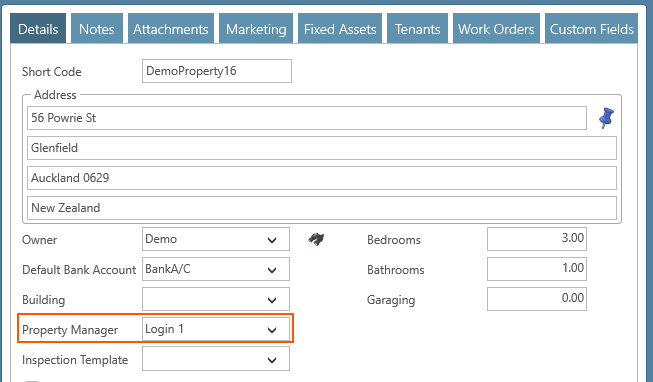
Remember that on the property details screen, you can specify the default 'Property Manager' for that property. Then when creating inspections, it will select that property manager as the default Inspector for that property.
Important notes:
- Previously scheduled inspections before linking to Google Calendar won't display in your calendar; only new or modified inspections will.
- Any changes made to inspection dates and times within RentHQ will sync with your Google Calendar. However, modifications made solely in Google Calendar won't reflect in RentHQ. Therefore, it's recommended to manage inspections exclusively within RentHQ for accurate synchronization.
Now, RentHQ users can link their accounts to Google Calendar on an individual basis, ensuring that only their designated inspections populate their calendar.
Here's how to set it up:
1. Navigate to Functions/Setup/Security Logins.
2. Select the user's login and access the Calendar tab.
3. Click on 'Sign in with Google' to connect your RentHQ user account to your Google Calendar.
Once linked, if you have multiple calendars, return to the login screen to designate the specific calendar for your inspections.
When creating inspections, it's important to select the appropriate 'inspector' to link the inspection correctly. For instance, in the images shown above with two logins, the Google calendar is linked to 'Login 1.' Therefore, ensure that the designated inspector is selected during inspection creation. Inspections without an assigned inspector won't be linked to any Google calendars.
Remember that on the property details screen, you can specify the default 'Property Manager' for that property. Then when creating inspections, it will select that property manager as the default Inspector for that property.
Important notes:
- Previously scheduled inspections before linking to Google Calendar won't display in your calendar; only new or modified inspections will.
- Any changes made to inspection dates and times within RentHQ will sync with your Google Calendar. However, modifications made solely in Google Calendar won't reflect in RentHQ. Therefore, it's recommended to manage inspections exclusively within RentHQ for accurate synchronization.
More Suggestion Updates for December
Posted on December 6, 2023
As per last month, a lot of enhancement suggestions have continues to roll in, and more of them have been completed. This is what was release in version 3.9.0.
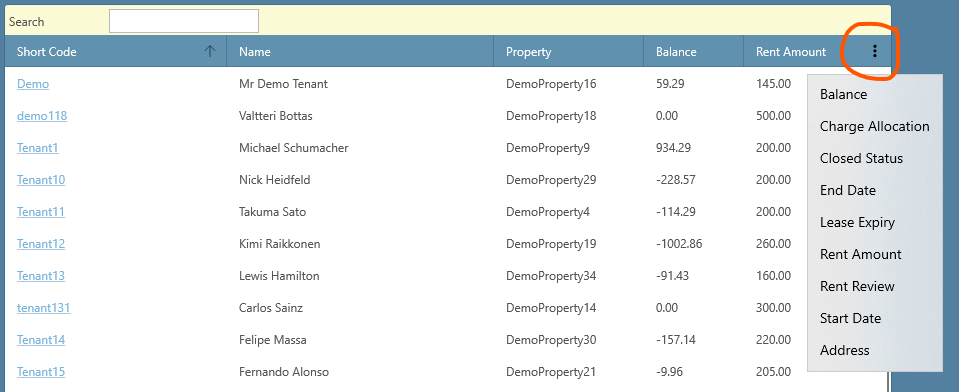
- A lot of suggestions were made regarding adding column XYZ to screen ABC. And all these suggestions wanted different columns. If I added every column to every screen that was suggested the screen could become cluttered with columns other people might not want. So instead you can now choose which additional columns you want to add to your screens. This has been done by adding a 3 dot button to the top right of certain screens. Not all screens have these additional columns. By clicking the 3 dot button you can choose which columns to add or remove again. This applies to the computer it was created on, so different people in the same office can choose to show the columns they want to see.
- A change has been made to the transaction import screen. You can start an import, then move to a different menu and come back to the import again, and it will be the same as when you left it. This means you wont have to start all over again. Thanks to Nicola for the suggestion.
- A new custom message has been created, allowing you to add a new message into the body of all tenant invoices, including extra charge invoices. Go to Functions/Setup/Options and then click on the Messages tab to enter the tenant invoice message. This message could contain payment instructions or bank account details. Thanks to Richard for the suggestion.
- You can now record a transaction in the cashbook screen, selecting a closed property, but only when the closed property has a tenant who is marked as 'Closed - Allow Transaction Entry'. Note that the closed properties will appear at the bottom of the property list. Thanks to Garth for the suggestion.
- April 2026
- March 2026
- November 2025
- October 2025
- August 2025
- July 2025
- June 2025
- May 2025
- January 2025
- December 2024
- November 2024
- September 2024
- August 2024
- July 2024
- June 2024
- May 2024
- April 2024
- March 2024
- February 2024
- December 2023
- November 2023
- October 2023
- September 2023
- August 2023
- July 2023
- June 2023
- May 2023
- January 2023
- December 2022
- November 2022
- September 2022
- August 2022
- July 2022
- June 2022
- May 2022
- April 2022
- March 2022
- February 2022
- December 2021
- August 2021
- July 2021
- May 2021
- February 2021
- January 2021
- September 2020
- August 2020
- July 2020
- May 2020
- March 2020
- February 2020
- January 2020
- December 2019
- October 2019
- September 2019
- August 2019
- July 2019
- June 2019
- May 2019
- April 2019
- January 2019
- December 2018
- October 2018
- September 2018
- August 2018
- June 2018
- May 2018
- April 2018
- February 2018
- January 2018
- December 2017
- November 2017
- September 2017
- August 2017
- May 2017
- April 2017
- March 2017
- February 2017
- December 2016
- November 2016
- October 2016
- September 2016
- August 2016
- July 2016
- June 2016
- May 2016
- January 2016
- October 2015
- September 2015
- August 2015
- June 2015
- May 2015
- April 2015
- March 2015
- January 2015
- November 2014
- October 2014
- September 2014
- August 2014
- July 2014
- June 2014
- May 2014
- April 2014
- March 2014
- February 2014
- January 2014
- December 2013
- November 2013
- October 2013
- September 2013
- August 2013
- July 2013
- May 2013
- April 2013
- March 2013
- February 2013
- January 2013
- December 2012
- November 2012
- October 2012
- September 2012
- August 2012
- July 2012
- June 2012
- May 2012
- April 2012
- March 2012
- February 2012
- January 2012
- December 2011
- October 2011
- September 2011
- July 2011
- February 2011
- January 2011